Java 23, SpringBoot 3.3.4: API Flow & Logging — Part 4
In the previous session (Part 3), we explored the Logback configuration, which provides precise control over logging in a Spring Boot application. This setup ensures you can capture detailed information where necessary, without flooding the application with excessive logs.
Now, we will shift our focus to the benefits of using AOP (Aspect-Oriented Programming) in Spring to handle cross-cutting concerns, particularly for logging. Before we delve deeper, let’s first understand how the Servlet mechanism processes an incoming request.
The following diagram illustrates the architecture of a Spring Boot MVC (Model-View-Controller) application. It highlights the flow of data and how different components interact within the Spring Boot framework. Here’s an explanation of the main elements:

1. Dispatcher Servlet
- This is the core of the Spring MVC architecture. All incoming HTTP requests (e.g., /cart/customer/{customerId}) first reach the Dispatcher Servlet. This component is responsible for routing requests to the appropriate handlers (Controller classes).
- It performs tasks such as URL mapping, determining which controller to send the request to, and handling responses
2. Handler Mapping
- The Handler Mapping helps the Dispatcher Servlet decide which controller method should process the request, based on the URL pattern.
3. Controller (RestController)
- The Controller, marked as @RestController, handles incoming HTTP requests. It interacts with the Service layer to perform the business logic.
- The controller is where the application’s endpoints (e.g., /cart/customer/{customerId}) are defined. It uses dependency injection (with @Autowired) to call services and fetch the required data.
- The controller handles requests and returns data in JSON or XML format (since it’s a RestController).
4. Service
- The Service layer is where the core business logic resides. It is annotated with @Service.
- It interacts with the Repository to fetch and process data. The service also uses dependency injection (@Autowired) to access repositories.
- This layer acts as an intermediary between the Controller and the Repository, ensuring that business rules are applied before data is fetched or sent to the user.
5. Repository
- The Repository layer is annotated with @Repository and is responsible for interacting with the Data Store (e.g., a relational database).
- It abstracts the actual database access code, allowing for simple CRUD operations (Create, Read, Update, Delete) on the data.
6. DTO (Data Transfer Object)
- The DTO is used to transfer data between layers. It provides a way to encapsulate data from the model and deliver it to the client in a simplified or formatted manner.
- DTOs are often used to avoid exposing the internal model structure directly to the outside world.
7. Model (@Entity)
- The Model is represented by the @Entity annotation, which maps Java objects to database entities.
- It represents the application’s data structure and is typically used by the Repository to interact with the database.
8. Data Store
- On the far right is the Data Store, which represents the application’s persistence layer (a database or other storage systems).
- This is where all data is ultimately saved and retrieved from.
Dependency Injection (IoC)
- The arrows between the Controller, Service, and Repository indicate Dependency Injection, where each layer relies on the next one to complete the operation.
- Spring manages these dependencies using Inversion of Control (IoC), which is a central concept in Spring frameworks. This ensures that components are loosely coupled and easier to test.
Flow Summary:
- Users send HTTP(S) requests (e.g., /cart/customer/{customerId}) through various devices.
- Requests pass through a firewall and reach the Dispatcher Servlet.
- The Handler Mapping maps the request to the correct Controller (annotated with @RestController).
- The Controller processes the request, often delegating the business logic to the Service layer.
- The Service interacts with the Repository to retrieve or store data in the Data Store.
- Data is sent back to the user, often formatted using DTOs.
Each of these layers (Controller, Service, and Repository) requires exception handling, logging, and security. We’ve already explored how exception handling is managed with AOP, and now we’ll dive into how logging is implemented using AOP.
Aspect — Time Tracker
@Before Aspect
The @Before annotation is used to execute advice before the execution of a method. This advice runs before the actual method logic, meaning it gets invoked right before the method call.
- @Before: The advice executes before the target method.
- execution(* com.example.service.*.*(..)): This pointcut expression specifies that the advice should be applied to any method within the com.example.service package.
- logStatementBefore(JoinPoint joinPoint): The advice takes a JoinPoint parameter, which contains details of the method being invoked (like method name, arguments, etc.).
@Aspect
@Configuration
public class TimeTrackerAspect {

    // Set Logger -> Lookup will automatically determine the class name.
    private static final Logger log = getLogger(lookup().lookupClass());

    /**
     * Log Message before the Log Execution
     * For All Classes = "execution(* io.fusion.air.microservice.adapters.controllers.*.*(..))")
     * With Sub Pkgs = "execution(* io.fusion.air.microservice.adapters.controllers..*.*(..))")
     * @param joinPoint
     */
    @Before(value = "execution(* io.fusion.air.microservice.adapters.controllers..*.*(..))")
    public void logStatementBefore(JoinPoint joinPoint) {
        log.debug("1|TA|TIME=|STATUS=START|CLASS={}",joinPoint);
    }
    // ... Showing only relevant code...
}
Use Cases:
- Logging: Capturing method entry points.
- Authentication and Authorization: Verifying permissions before a method executes.
- Validating input: Ensuring method arguments are valid before proceeding.
@After Aspect
The @After annotation is used to execute advice after the method has finished execution, regardless of its outcome (whether it threw an exception or returned successfully). This is useful for tasks that should run after the completion of a method, such as resource cleanup.
- @After: This advice runs after the target method completes execution (whether successfully or with an exception).
- execution(* com.example.service.*.*(..)): Again, a pointcut expression specifying which methods to apply the advice to.
- logStatementAfter(JoinPoint joinPoint): The advice logs the method name after execution.
@Aspect
@Configuration
public class TimeTrackerAspect {
    // ...

    /**
     * Log Message after the Method Execution
     * For All Classes = "execution(* io.fusion.air.microservice.adapters.controllers.*.*(..))")
     * With Sub Pkgs = "execution(* io.fusion.air.microservice.adapters.controllers..*.*(..))")
     * @param joinPoint
     */
    @After(value = "execution(* io.fusion.air.microservice.adapters.controllers..*.*(..))")
    public void logStatementAfter(JoinPoint joinPoint) {
        log.debug("9|TA|TIME=|STATUS=END|CLASS={}",joinPoint);
    }

    // ... Showing only relevant code...
}
Use Cases:
- Logging: Capturing method exit points.
- Resource management: Closing file or database connections after operations.
- Auditing: Tracking method completions, whether successful or failed.
Difference between @After and @AfterReturning or @AfterThrowing:
- @After: Runs after a method, regardless of the result (whether exception or not).
- @AfterReturning: Runs only if the method completes successfully without exceptions.
- @AfterThrowing: Runs only if the method throws an exception.
@Around Aspect
The @Around annotation is more powerful as it allows you to control the entire method execution. You can define custom behavior before and after a method, and even modify the method’s return value or prevent the method from being called.
- @Around: This advice allows both pre- and post-method execution behavior.
- ProceedingJoinPoint joinPoint: Unlike JoinPoint, ProceedingJoinPoint is used to actually invoke the method using the proceed() method.
- joinPoint.proceed(): This method invocation executes the target method. You can manipulate the return value or the method’s arguments before invoking it, or even skip the invocation entirely.
- Custom logic: You can execute custom logic both before and after the method, making it more flexible than @Before or @After.
@Aspect
@Configuration
public class TimeTrackerAspect {
    // ...

    /**
     * Capture Overall Method Execution Time For Controllers
     * For All Classes = "execution(* io.fusion.air.microservice.adapters.controllers.*.*(..))")
     * With Sub Pkgs = "execution(* io.fusion.air.microservice.adapters.controllers..*.*(..))")
     * @param joinPoint
     * @return
     * @throws Throwable
     */
    @Around(value = "execution(* io.fusion.air.microservice.adapters.controllers..*.*(..))")
    public Object timeTrackerRest(ProceedingJoinPoint joinPoint) throws Throwable {
          // Check TracTime method for the Business Logic
          return trackTime("WS", joinPoint);
    }

    // ... Showing only relevant code...
}
Use Cases:
- Transaction management: Start a transaction before the method and commit or rollback after.
- Performance monitoring: Capture the method’s start and end times to calculate the duration.
- Custom logic: You can override, skip, or alter the method execution entirely.
Time Tracker Logic
@Aspect
@Configuration
public class TimeTrackerAspect {
    // ... Showing only relevant code...

    /**
     * Track Time
     * @param _method
     * @param joinPoint
     * @return
     * @throws Throwable
     */
    private Object trackTime(String _method, ProceedingJoinPoint joinPoint) throws Throwable {
        long startTime = System.currentTimeMillis();
        String status = "STATUS=SUCCESS";
        try {
            return joinPoint.proceed();
        }catch(Throwable e) {
            status = "STATUS=ERROR:"+e.getMessage();
            throw e;
        } finally {
            logTime(_method, startTime, status, joinPoint);
        }
    }

    /**
     * Log Time Taken to Execute the Function
     * @param _startTime
     * @param _status
     * @param joinPoint
     */
    private void logTime(String _method, long _startTime, String _status, ProceedingJoinPoint joinPoint) {
        long timeTaken=System.currentTimeMillis() - _startTime;
        log.info("3|{}|TIME={} ms|{}|CLASS={}|",_method, timeTaken, _status,joinPoint);
    }
}
Summary of Use:
- @Before: Run advice before a method. Useful for logging, security checks, input validation, etc.
- @After: Run advice after a method, regardless of the outcome. Common for cleanup actions.
- @Around: Controls the entire method execution. It’s the most flexible advice type, offering complete control over method invocation.
These annotations are used to inject cross-cutting concerns in a clean and modular way, allowing you to separate logic like logging, transaction management, security, and performance monitoring from the core business logic of your application.
Let’s now take a closer look at the API request flow, spanning the Java Servlet, Spring’s internal processes, and your code within the Controller, Business Service, and Repository layers.
REST API Flow
The diagram outlines the API Flow in a Spring Boot MVC application, showing how an HTTP(s) request is processed through various contexts (Servlet, Spring, and Application Contexts). Let’s break down each stage and its corresponding components in the flow, as well as their context (marked in different colours).
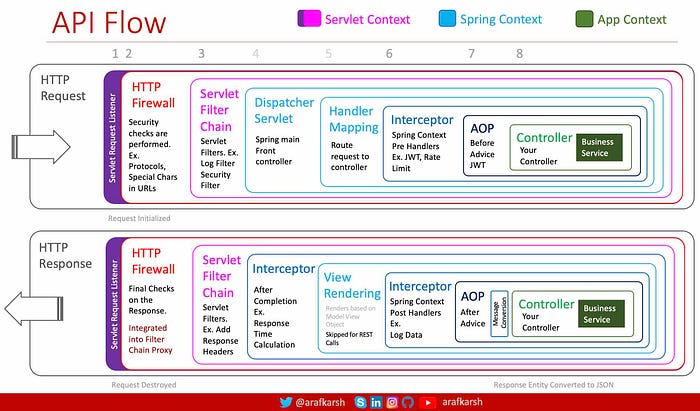
HTTP Request Flow (Top Half)
1. Servlet Request Listener
- Context: Servlet Context
- Purpose: It listens to the initialization and destruction of requests. This acts as a lifecycle hook for the incoming HTTP request.
2. HTTP Firewall
- Context: Servlet Context (Purple)
- Purpose: The HTTP firewall applies security checks before the request moves further. For example, it checks if the protocol is valid, verifies URLs for special characters, and ensures the request conforms to security policies.
3. Servlet Filter Chain
- Context: Servlet Context (Purple)
- Purpose: The request passes through the Servlet Filter Chain, which applies various servlet filters such as logging, security checks, or rate limiting. These filters execute pre-processing logic on the request. For example:
- Logging filters that log incoming requests.
- Security filters that check authentication tokens.
4. Dispatcher Servlet
- Context: Spring Context (Blue)
- Purpose: The Dispatcher Servlet is the front controller for Spring MVC. It receives the incoming request from the Servlet Filter Chain and coordinates the entire processing. It routes the request to the correct controller based on the URL pattern.
5. Handler Mapping
- Context: Spring Context (Blue)
- Purpose: Handler Mapping is responsible for determining which controller method should handle the incoming request. It routes the request to the appropriate handler based on the URL and method (GET, POST, etc.).
6. Interceptor
- Context: Spring Context (Blue)
- Purpose: The Interceptor is a Spring mechanism to process logic before and after the request reaches the controller. For instance, pre-handlers like JWT token validation or rate limiting can be applied here.
7. AOP (Aspect-Oriented Programming)
- Context: App Context (Green)
- Purpose: AOP Advice such as @Before advice can be applied at this stage to execute code before the method invocation (e.g., logging, JWT validation). This allows cross-cutting concerns to be cleanly separated from business logic.
8. Controller
- Context: App Context (Green)
- Purpose: The Controller contains the business logic that processes the incoming request and communicates with the service layer. After processing the request, it sends a response back to the client. The controller is often annotated with @RestController or @Controller.
9. Business Service
- Context: App Context (Green)
- Purpose: The Business Service layer executes the core business logic and interacts with repositories or other services to perform the necessary tasks. The controller delegates the business logic to the service layer.
HTTP Response Flow (Bottom Half)
In the flow above, the request reaches the Database Layer (Repository), where it either retrieves data or processes a save/update operation. Next, in the HTTP response flow, we will move in reverse order — starting from the retrieval of data or the save/update status, and culminating in sending the HTTP response back to the end user (or the client that invoked the API).
7. Message Conversion
- Context: App Context (Green)
- Purpose: If the controller returns an object, it needs to be serialized into JSON or XML (depending on the content type). Message Conversion handles this task and converts the Java objects into appropriate formats before sending the response to the client.
6. AOP (Aspect Oriented Programming)
- Context: App Context (Green)
- Purpose: AOP After Advice can be executed after the controller logic is complete. For instance, this advice might log the response, perform resource cleanup, or handle error handling/logging if an exception was thrown.
5. Interceptor (Post)
- Context: Spring Context (Blue)
- Purpose: After the response is rendered (or skipped in the case of REST), post-interceptors can be used to log the response or perform further post-processing.
4. View Rendering
- Context: Spring Context (Blue)
- Purpose: In the case of traditional MVC (not REST APIs), View Rendering takes place at this stage. The view resolver renders a view (e.g., HTML, Thymeleaf) using the data from the controller. For REST APIs, this step is often skipped because the response is typically JSON or XML.
3. Interceptor
- Context: Spring Context (Blue)
- Purpose: Post-handlers within the Interceptor handle logic that runs after the controller has processed the request, such as calculating response time or adding additional logging data.
2. Servlet Filter Chain
- Context: Servlet Context (Purple)
- Purpose: The Servlet Filter Chain processes the response before it is sent back to the client. For example, filters may add headers to the response, such as caching headers or security-related headers (like CSP policies).
1. HTTP Firewall
- Context: Servlet Context (Purple)
- Purpose: Similar to the request flow, the HTTP Firewall performs final checks on the response, ensuring that no malicious content is passed back to the client.
Key Contexts in the Flow
1. Servlet Context (Purple):
- This is the base context in a web application, handling the low-level web request and response lifecycle, such as firewalls and filters.
2. Spring Context (Blue):
- The core of Spring’s web MVC framework that manages routing, request handling, and view rendering. It connects the application-specific logic to the underlying servlet system.
3. Application Context (Green):
- This context is where business logic resides. It includes the controllers and services that handle core application processing, often influenced by cross-cutting concerns through AOP and dependency injection.
Summary of the Flow:
- HTTP Request starts from the client and passes through several stages, including firewalls, filters, interceptors, and AOP advice before reaching the controller that performs the business logic.
- After processing the request, the HTTP Response follows a similar path, passing through filters, post-interceptors, and message converters before being sent back to the client.
This layered approach promotes a clear separation of concerns, such as security, logging, and business logic, and aligns with the principles of Hexagonal Architecture, utilizing Spring’s Dependency Injection. It offers flexibility and maintainability, especially for large-scale applications or microservices architectures.
In the next section, we will explore the monitoring aspects of the service, focusing on features provided by Micrometer, Prometheus, and Spring Actuator to gain deeper insights into the health and performance of the service or application.
Enjoy the week with a Cup of Java sprinkled with SpringBoot & AOP…
Source Code: GitHub Repository: ms-springboot-334-vanilla — Microservice Template with SpringBoot 3.3.4 with Java 23 and Jakarta EE 10. NFRs — AOP, Exception, Logging, Micrometer, Crypto and Security (JWT) Framework.
Java 23, SpringBoot 3.3.4 & Jakarta 10 Series
- Java 23, SpringBoot 3.3.4 & Jakarta 10 — Part 1
- Java 23, SpringBoot 3.3.4: AOP Exception Handling — Part 2
- Java 23, SpringBoot 3.3.4: Logback Setup — Part 3
- Java 23, SpringBoot 3.3.4: Log/Events: API Flow & Logging — Part 4 (This article)
- Java 23, SpringBoot 3.3.4: Metrics: Micrometer, Prometheus, Actuator — Part 5
- Java 23, SpringBoot 3.3.4: Metrics: Micrometer & AOP — Part 6
- Java 23, SpringBoot 3.3.4: Tracing: OpenTelemetry — Part 7
- Java 23, SpringBoot 3.3.4: Tracing: OpenTelemetry In Action — Part 8 Coming Soon
- Java 23, SpringBoot 3.3.4: Filters: Security, Log — Part 9 Coming Soon
- Java 23, SpringBoot 3.3.4: AOP: Spring Security — Part 10 Coming Soon
- Java 23, SpringBoot 3.3.4: CRUD — Part 11 Coming Soon
- Java 23, SpringBoot 3.3.4: CRUD Queries & Page Sort — Part 12 Coming Soon
Further Research
- Spring Boot Features: Logging
- Spring Boot Logging: How to Guides
- Logback: Chapter 1: Introduction
- Logback: Chapter 2: Architecture
- Logback: Chapter 4: Appenders
- Spring Boot: Dispatcher Servlet